Appearance
Viewing and Interacting with Findings
Findings are grouped into three different tab sections: Overview, Findings, and Files each offering a different perspective for reviewing scan results. Choose the view that best suits your workflow:
Overview Tab
Shows all findings from top to bottom, ranked individually from most critical to least critical. Findings sharing the same severity bucket (e.g., two Medium findings) carry equal weight—there is no internal ordering inside a bucket. This view is ideal for prioritizing the most severe issues across your entire codebase.
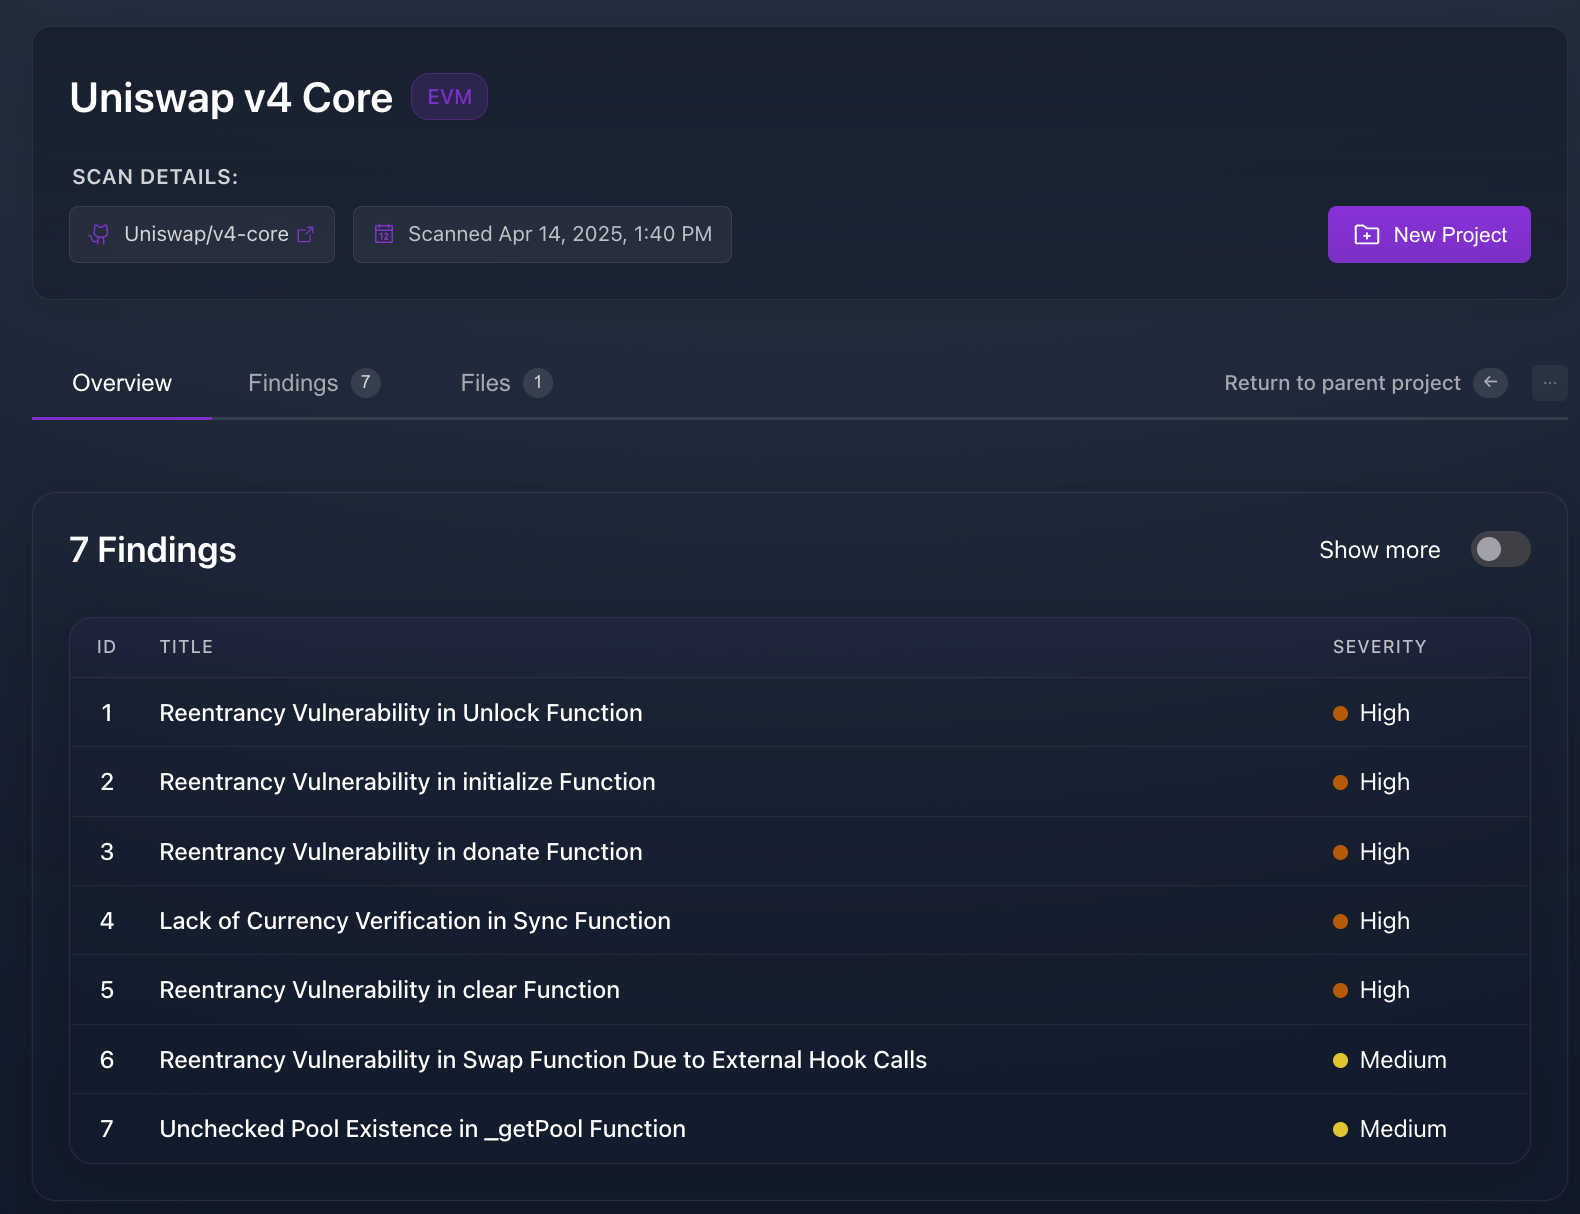
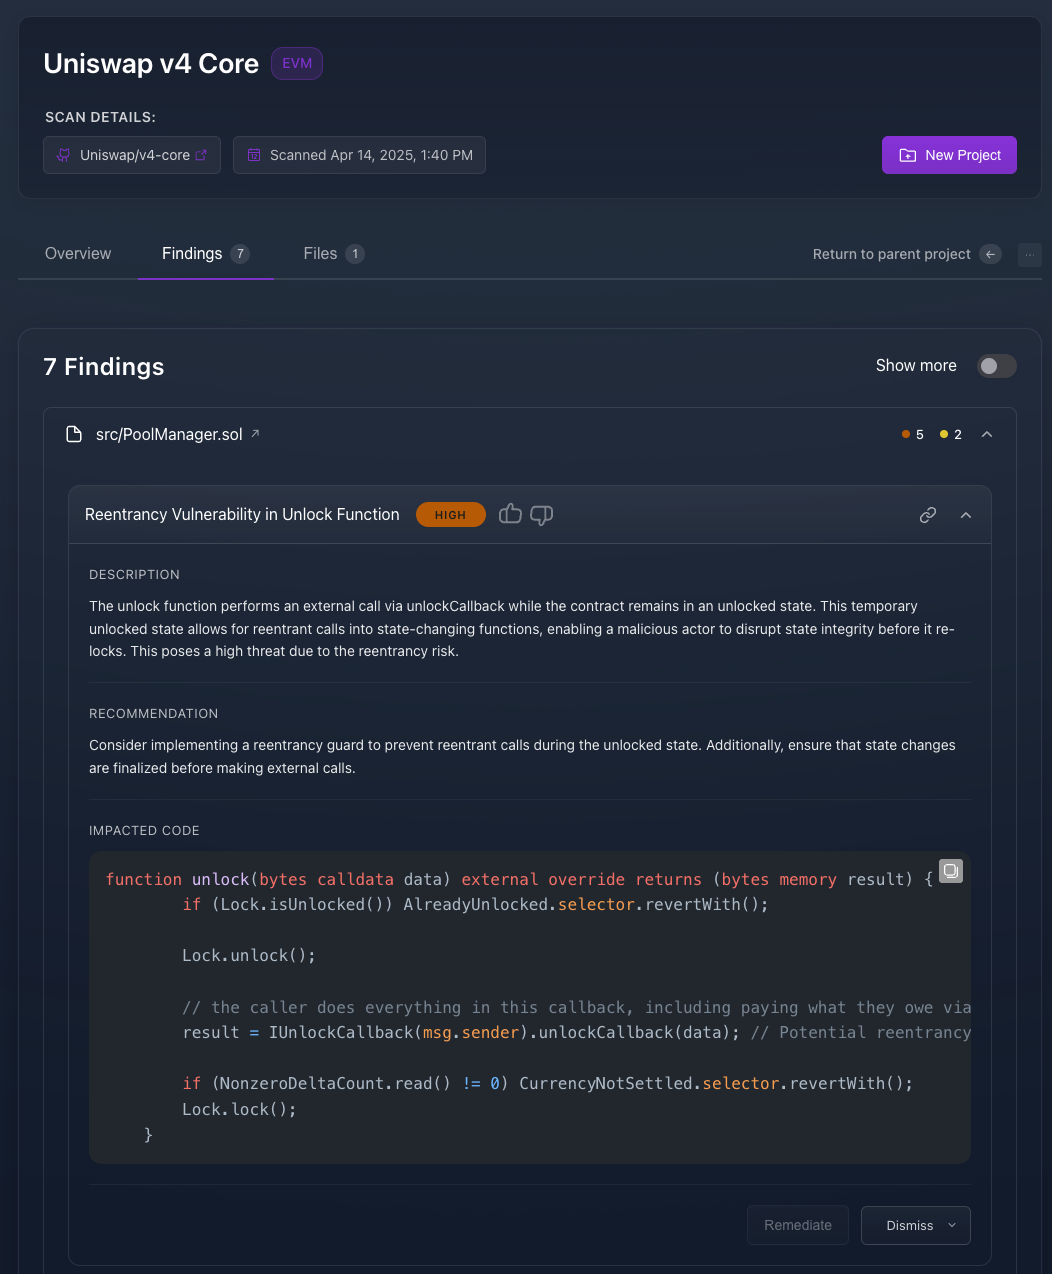
Findings Tab
Here you can see the full context for every finding — the impacted code, severity label, file path, and action buttons.
- Dismiss Finding – hide false positives or items you’re not going to fix.
- Generate POC – create a reproducible exploit script.
- Filter & Search – narrow the list before diving in.
The file path at the top of each finding is a link to the exact line in your repo, making it easy to pivot between code and results.
This helps you quickly identify the exact location of findings in your codebase.
The file path displayed at the top of each finding functions as a hyperlink that:
- Links directly to the specific file in your repository
- Opens the file at the exact location of the vulnerability
- Allows quick navigation between findings and source code
WARNING
Each file and finding is collapsible for easier navigation. However, collapsed settings are not persistent, meaning if you leave the page, the initial uncollapsed setting is restored.
Copy for LLM
Use Copy for LLM to copy a structured, paste-ready summary of a finding (title, severity, description, impacted code, and context) into your clipboard.
In the Findings UI, click the clipboard icon to copy the finding summary:
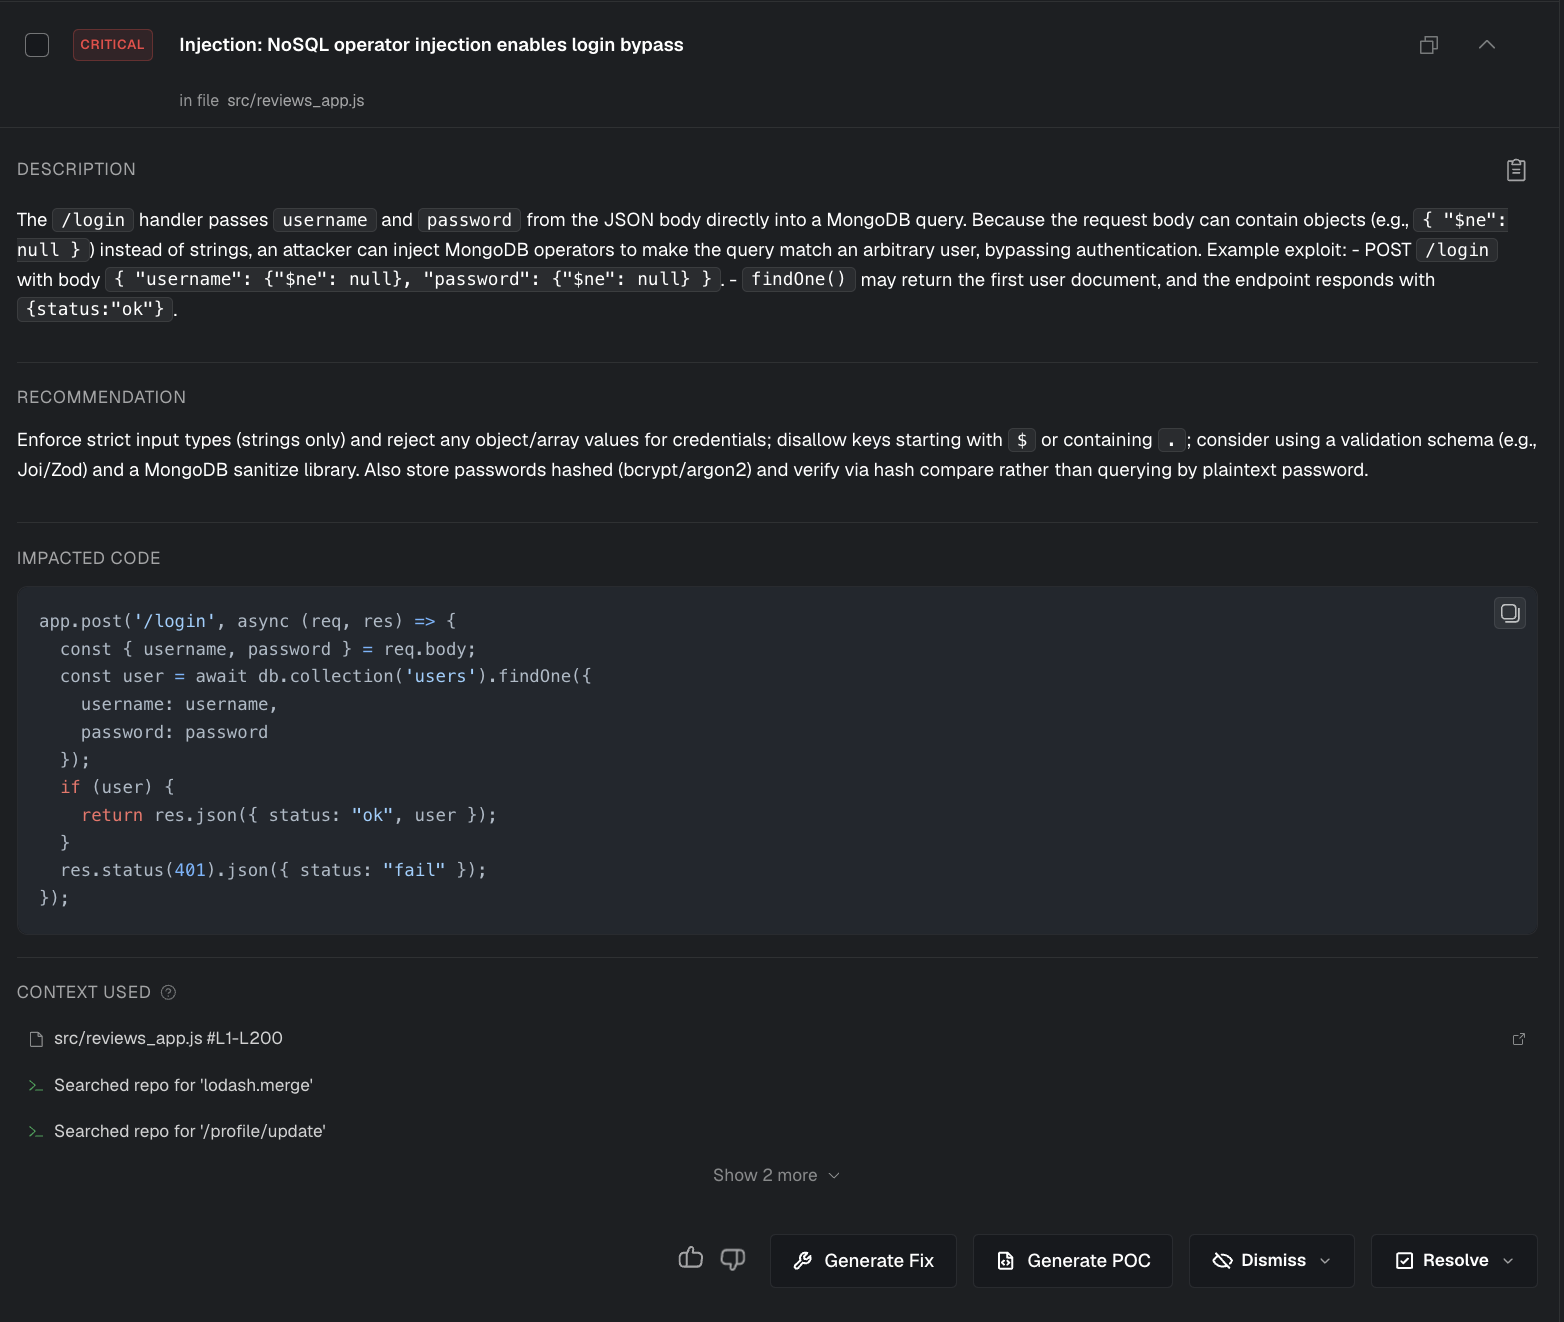
Example output
Security Finding in src/reviews_app.js
Finding ID: 3259fe15-ea61-4e22-aeef-f1ffbc8ce9bb
Severity: CRITICAL
Matched Rule:
Title: NoSQL operator injection enables login bypass
Description: The /login handler passes username and password from the JSON body directly into a MongoDB query. Because the request body can contain objects (e.g., { "$ne": null }) instead of strings, an attacker can inject MongoDB operators to make the query match an arbitrary user, bypassing authentication.
Example exploit:
- POST
/loginwith body{ "username": {"$ne": null}, "password": {"$ne": null} }. findOne()may return the first user document, and the endpoint responds with{status:"ok"}. Recommendation: Enforce strict input types (strings only) and reject any object/array values for credentials; disallow keys starting with$or containing.; consider using a validation schema (e.g., Joi/Zod) and a MongoDB sanitize library. Also store passwords hashed (bcrypt/argon2) and verify via hash compare rather than querying by plaintext password. Impacted Code :
app.post('/login', async (req, res) => {
  const { username, password } = req.body;
  const user = await db.collection('users').findOne({
    username: username,
    password: password
  });
  if (user) {
    return res.json({ status: "ok", user });
  }
  res.status(401).json({ status: "fail" });
});
Context Used:
- Searched repo for 'lodash.merge'
- src/reviews_app.js #L1-L200
- Searched repo for '/profile/update'
- Searched repo for 'MongoClient.connect'
- Searched repo for 'app.use('
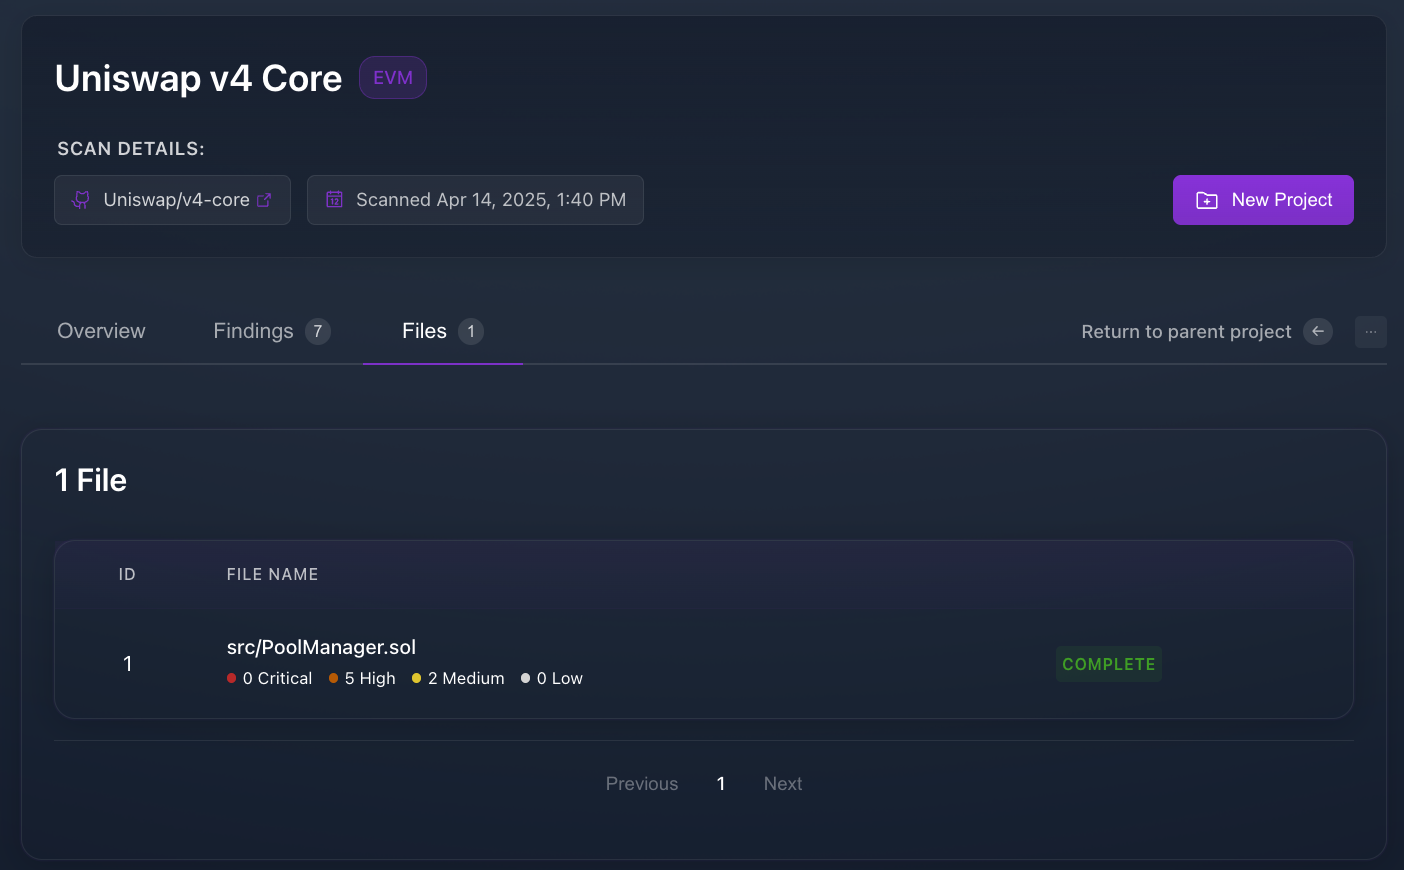
Files Tab
Shows all project files with their respective vulnerability classifications and number of findings per file. This view helps identify which files need the most attention. Here you can also view the Scan Status of each file.
Likes and Dislikes
Each finding includes thumbs up (👍) and thumbs down (👎) buttons that allow you to provide feedback on the quality and accuracy of our findings.

This feedback helps Almanax:
- Improve the accuracy of future scans.
- Refine our vulnerability detection models.
- Better understand which findings are most valuable to users.
- Reduce false positives and improve true positive detection.
Handling Too Many Findings
These are some strategies to manage and optimize results when a scan produces too many findings:
- Low Noise mode.
1. Use Scan Configuration
- Exclude test files and directories using patterns like
**/*.test.solortest/**. - Focus on production code by excluding vendor libraries and mocks.
- Use more specific include patterns to target only relevant files.
2. Leverage Classification
- Use the Overview tab to sort findings by severity.
- Consider filtering out Low findings to focus on critical issues.
Dismissing Findings
If a finding isn’t relevant you can remove it from active views by dismissing it. Click Dismiss on the finding card. Dismissed findings are stricken out and moved to the bottom views, but remain accessible via the status filter and can be restored at any time.
Dismissal reasons:
- False Positive – not actually a vulnerability; trains Almanax to suppress similar matches.
- Nit – minor style or best-practice issue with no security impact.
- Won’t Fix – acknowledged problem that the team has decided not to remediate.
Every dismissal records who performed it and when, giving full auditability.
4. Rescan After Cleanup
- After dismissing findings, run a rescan to get a cleaner view.
- The AI model will learn from your dismissals and provide more focused results.
TIP
Start with a small subset of files to establish patterns, then expand to larger codebases once you've optimized the configuration.
Proof-of-Concept (POC) Generation
Sometimes you need to demonstrate that a vulnerability is exploitable. Click Generate POC on any finding to have Almanax craft a minimal exploit script plus technical notes.
- Expand the finding and click Generate POC.
- Almanax sends the context to the LLM and generates a tailor-made exploit or reproduction script.
- The POC appears inline – copy it, share it, or regenerate at any time.
Each generation consumes a slice of your LLM usage quota; the estimated token cost is shown before you confirm.
Filtering & Search
While reviewing findings you can quickly narrow the list using the toolbar above each list/table:
Free-text search
• Type any word or phrase in the search bar to match against the finding title, description, and impacted code.
Filter menu
Select one or more of the following:
- Severity – Critical, High, Medium, or Low.
- File Name – tick specific files.
- File Type – filter by extension (e.g. .sol, .ts, .go).
- Path Pattern – supply a glob such as
contracts/**/proxy/*.
All selected filters combine with AND logic. Each active filter appears as a “pill” under the toolbar; click the × to remove it or Clear filters to reset all at once.
Group by
Use Group by → Severity | File to change how results are organised — especially handy after applying filters.
Filters and search work identically in the Overview, Findings, and Files tabs. They do NOT change the underlying ranking: findings inside the same severity bucket remain equal-weight, even when filters are active.